Showing posts with label holiday. Show all posts

Friday, March 18, 2011

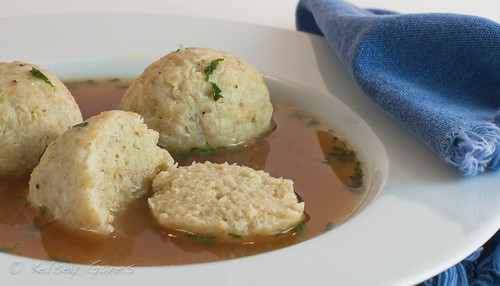
Product Review - Eena Kadeena Mock-Zah Ball Mix


Produced by Eena Kadeena, LLC.
2095 NW Aloclek Dr.
Suite 1114
Hillsboro, OR 97124

Tel. (503) 705-3007
info@eenakadeena.com
Twitter @eenakadeena // on Facebook

Ingredients
Organic quinoa flakes, organic potato flakes, dehydrated onion, salt, organic dehydrated garlic, guar gum, vegetable mono diglycerides, black pepper.

Overall Rating - 5/5 Stars
With Passover coming up, keep these in mind! They are sure to be crowd pleasers and make for a gluten-friendly holiday for everyone. Not traditional, but allergy friendly - I'm down.

Taste
Becky: Delicious. Period. Okay, not really, because I'm not known to be a woman of few words, and leaving my review at "delicious" just wouldn't cut it where Mock-Zah Balls are concerned! I do believe that this will be the first time my review will be an unqualified, no-questions-left-to-ask "Five Stars." I'm not Jewish, and matzah balls have never been in my culinary repertoire, so this was a whole new world for me. My only experience with matzah balls was when I was very young, and I just don't remember anything spectacular about them. That all changed when I made them from this mix. These are truly wonderful - tasty on their own (yes, I ate two right out of the pot), and even more so after dropping into my homemade chicken soup. I will add these to my grocery list from now on because they are... I'm repeating myself... DELICIOUS!

Kelsey: I was actually rendered speechless by these little pockets of perfection. Really and truly! I was incredibly skeptical after the "dump everything in a bowl and combine" instructions, and when the balls floated to the surface of the boiling water only a minute after I first submerged them, I feared for the worst: "25 more minutes? Are they nuts?" But as with every product review, I always follow the instructions to the letter - and were my (non)efforts rewarded! This mix came together so easily, the most difficult part was waiting while the mix chilled in the refrigerator and boiled merrily on the stovetop! They were perfect - better than the "real deal", if you ask me. Perfectly seasoned (not too salty, just enough garlic and spices to taste like they have been simmering in Bubbe's chicken soup all day!), they soak up just enough broth to taste like whatever soup you're serving them in without becoming flavorless themselves - so perfect!

Texture
Becky: It's hard to be critical when something is as tasty as these are! The texture is NORMAL. Yep - totally, utterly, dumpling-y NORMAL! Perfectly chewy and full of the broth flavor of my soup on the outside, tender and flavorful on their own inside. There's nothing more to say here except "perfection".

Kelsey: I swear, better than their gluten-filled counterparts! Not in the least bit dry or mealy, the quinoa and potato flakes combined into the dynamic duo of deliciousness! They weren't gummy or soggy or chewy or crumbly or anything less than unbelievable! Now, I didn't finish all of mine in a single batch, so I took one of the dozen or so that wound up in a tupperware container in the refrigerator and ate it. Cold. Standing right in front of the fridge, door open. It was amazing. They were still moist, 36 hours later in a container that, admittedly, does not seal very well (I'm a broke post-grad, ok?!) and they were still perfect. How do you top that?!

Storage
Becky: This is the most gorgeous, space-saving packaging I've ever seen. There's little waste here - the box is small - about the size of a box of tea - , and I actually held a nagging doubt that there was enough mix in the box to be worth it. There is, and the box is so pretty I might just want to store it on the counter! Inside is a clear plastic liner that I really like - easy to see exactly what I'm getting in that pretty box, and such thin plastic that there's little waste inside the box, too.

Kelsey: Cutest. Packaging. Ever. "Mock-Zah Balls" and "'Chai' our pancakes" - stylish design, conveniently sized box, trendy colors and punny titles - love it!

Cost
Becky: On the Eena Kadeen website this mix sells for $7.95 - not out of the realm of realistic for such a high-quality gluten free product, and I will certainly be purchasing these to have on hand. Also, from what I can glean about the making of gluten-rich matzah balls, the simplicity of making these in comparison makes the cost well worthwhile. I hope the price doesn't go any higher, though - that might put them into the category of "special events food," instead of the category they belong in for me: "staple".

Kelsey: AMEN.

Availability
The Mock-Zah Ball mix, along with a range of other gluten free mixes, is available on the Eena Kadeena website for now. Those living in California, Washington state, and Oregon will find the mixes in a small handful of stores as well. I still give this a five star rating because the web ordering through the company is so safe and easy, and also given the number of people who own computers on which to do their ordering!

Thursday, March 17, 2011

St. Patrick's Day Recipe Roundup

Because no food-related holiday is complete without a recipe roundup! Here are a few of our favorite St. Patrick's Day appropriate recipes - including a different take on the traditional corned beef brisket!

Friday, February 11, 2011

Hale's Kitchen: Hunter's Valentine Lava Cakes


This month, Glutenfreeda's budding young chef Hunter Hale shows us how to make Chocolate Lava Cakes, just in time for Valentine's Day! Perfect single-serving desserts, these decadent cakes come together as easy as pie and are a great way to impress and pamper that special someone this weekend!

Chocolate Lava Cake

Ingredients
Centers**
2 oz. semi-sweet gf chocolate, chopped
1/4 cup whipping cream

For cake
Unsalted butter or gf non-stick cooking spray for ramekins
4 oz. semi-sweet chocolate, chopped
8 Tablespoons unsalted butter
2 eggs
2 egg yolks
1/3 cup sugar
1/2 teaspoon vanilla
1/4 cup gluten free flour mix (we love Jules All-Purpose Blend)
Fresh strawberries for garnish

Directions
Centers

Add chocolate and whipping cream to the top of a double boiler over simmering water. Stir until all is melted and blended. Remove from heat and place in refrigerator for at least 2 hours to chill. When chilled, scoop chocolate mixture with a rubber spatula and form into 6- 1" balls.

Place balls in a small bowl and keep in refrigerator until ready to use.

Cake
Preheat oven to 400 degrees F. Butter or spray 6 ramekins with gf non-stick cooking spray.
Add 4 oz. chopped chocolate and butter to the top of a double boiler over simmering water. Stir until melted and blended; remove from heat. Add eggs, egg yolks, sugar and vanilla to a medium bowl and beat on high speed for about 5 minutes, until pale and thick. Fold melted chocolate and flour into egg mixture until all is blended.

Spoon batter into ramekins. Place 1 chocolate ball in the middle of each ramekin. Gently press ball to bottom of ramekins. Bake for 15 minutes; remove from oven and let sit for 5 minutes. Run a small knife along the edge of the ramekins and invert onto serving plates. Top each lava cake with sliced strawberries. Serve immediately.

**For an even easier option, use store-bought gluten-free chocolate truffles in the flavor of your choosing and simply press into the batter as you would our chocolate centers!

Monday, February 7, 2011

Thursday, February 3, 2011

Happy Chinese New Year!

Today marks the beginning of the most important Chinese holiday - the lunisolar New Year. Lasting for 15 days, this annual festival begins on the first day of the new month and ends with the Lantern Festival, welcoming spring. With themes of happiness, wealth and longevity, this is a very family-oriented holiday featuring beloved traditional recipes. Here are our interpretations of some of these classic dishes....

Peking Duck
Fresh Vegetable Spring Rolls (pictured above)
Fried Mushroom & Leek Spring Rolls (pictured at right)

Tuesday, December 28, 2010

Recipe of the Week: Lemon Bars

Sweet and tangy, few desserts are as refreshing as our classic lemon bars!

Lemon Bars with Cheesecake Filling
Makes 16 lemon bars

Ingredients
1/2 cup unsalted butter, at room temperature
1/4 cup firmly packed brown sugar
1 teaspoon vanilla extract
1 cup gluten free flour
8 oz. cream cheese, at room temperature
1-1/2 cups powdered sugar
1 large egg
1 teaspoon lemon zest
1 teaspoon vanilla extract
4 egg yolks
3/4 cup sugar
1 Tablespoon cornstarch
1/4 cup Key lime juice
2 teaspoons lemon zest
2 Tablespoons unsalted butter
Garnish with lime or lemon slices

Directions
Preheat oven to 325°F. Lightly grease a 8 inch square baking pan.

In a stand mixer, beat 1/2 cup butter and brown sugar until light and fluffy. Add 1 teaspoon vanilla, beating until blended. Add the gluten free flour and beat on low speed until incorporated. Press the dough into the prepared baking pan. Bake for 25 minutes or until crust is golden brown. Let cool on a wire rack.

Meanwhile, beat the cream cheese and the powdered sugar utnil creamy. Add the egg, 1 teaspoon lemon zest and 1 teaspoon vanilla; beat until combined. Cover and chill.

Combine the egg yolks, 3/4 cup sugar and cornstarch in a medium saucepan; stir in 3/4 cup water and key lime juice. Cook over medium-low heat, stirring constantly, until the mixture thickens and coats the back of a spoon. Remove from heat and stir in 2 teaspoons lemon zest and 2 tablespoons butter. Let cool for 10 minutes.

Spread the cream cheese filling over the cooled crust. Pour the lemon curd over the cream cheese filling. Bake at 325°F for 40 minutes or unil the edges are lightly browned. Let cool completely on a wire rack then cover and chill for 2 hours. Cut into squares and garnish with lemon or lime slices.

Tips
We used Jule's All Purpose Gluten-free flour mix in this recipe.

Monday, December 27, 2010

Menu Monday: New Year's Eve Celebration


Here at Glutenfreeda, we are all about planning ahead and designing menus that make for flawless execution. With recipes that can be begun in stages, from several hours to several weeks in advance, our New Year's Eve menu will not only impress your guests - its ease will impress you, too!

Here are Chef Yvonne's Top Ten Tips for an effortless New Year's Eve party!

10…Focus on appetizers that are naturally gluten-free. Your hors d’oeuvres won’t taste funny (or gluten-free) because they are what they are supposed to be — naturally authentic. This will also help you out because you won’t have to hunt for special gluten-free items — you can actually shop at the grocery store! What a concept!!!

9…If hors d’oeuvres are the only food offered at your party there should be at least 6 different appetizers — figuring 2-3 pieces per person per appetizer.

8…To calculate for hors d’oeuvres not in pieces (like dips or pâtés) assume 1 ounce is equal to 1 piece.

7…Create a balance between hot and cold dishes.

6…If you are planning on having 20-25 guests or more for hors d’oeuvres you should include some ‘bulk’ type items in your menu. Otherwise you will find yourself making hundreds of little things.

5…For an hors d’oeuvre party where you are not planning on serving a ‘meal’, plan on serving some more substantial items with small plates and forks.

4…Be creative with your serving dishes. Plan some hors d’oeuvres to be served in fun cocktail glasses for a festive touch.

3…Plan desserts that can be served in bite-size portions and that can be prepared a day or so in advance.

2…Stock up on liquors and wine. Unless you plan on hiring a professional bartender, sometimes it is easier and more fun to serve just one type of cocktail, made up in batches. Or display just the four basic liquors — Scotch, Bourbon, Gin & Vodka along with an assortment of appropriate mixers, a bucket of ice and glasses of various sizes.

1…Once the party has started, sit back, relax and enjoy! Don’t fret about the little things. Most likely you will be the only one who will notice if forgot the garnish on the shrimp!


On the Menu...

Monday, December 20, 2010

Menu Monday: Intimate Holiday Dinner Menu

In slight contrast to our Elegant Holiday Dinner Menu, this meal is much more, shall we say, cozy. While still quite impressive and perfect for entertaining a small group of guests, this menu features more comfort-style foods, perfect for a wintry dinner party!

This holiday menu is a little more toned down, but still perfect for entertaining a smaller crowd. This menu starts off with mouthwatering Sausage Stuffed Mushrooms – each mushroom cap is filled with a sausage – cornbread stuffing and then topped with cheese and baked until juicy and brown. Follow the starter with a salad that is not only beautiful in presentation but also packed with flavor – Pear, Beet & Fennel Salad. For the entrée serve Apple Stuffed Cornish Hens, Rice Pilaf with Apricots and Green Beans with Toasted Hazelnuts. Depending on the appetites of your guests you can either serve each guest with a whole hen or half. I typically like to serve half a hen just due to the number of the other menu items. And for dessert treat your guests to Lemon Bars with Cheesecake Filling….make sure to make plenty as it is difficult to just eat one.
-Chef Yvonne

On the Menu
Sausage Stuffed Mushrooms
Pear Beet & Fennel Salad (pictured, below)
Apple Stuffed Cornish Hens (pictured, right)
Rice Pilaf with Apricots
Green Bean with Toasted Hazelnuts
Lemon Bars with Cheesecake Filling

We have many other menus for you to choose from if perhaps you are looking for something a little different this year. For more menu ideas check out our article archives under the holiday months or look in our menu archives. We hope you and your family and a wonderful, safe and delicious holiday!

Wednesday, December 15, 2010

GFCF Weekly Roundup: Mock Sour Cream Coffee Cake

Who doesn't love coffee cake? Especially cooked in a decorative bundt pan, this recipe is always an impressive hit. Elegant and delicious, you and your guests will never be able to tell the difference at your next holiday brunch or dinner party!

Mock Sour Cream Coffee Cake

Ingredients

1 cup chopped walnuts
1 Tablespoon sugar
1 teaspoon cinnamon
2 cups gluten free flour
1 teaspoon baking powder
1/4 teaspoon salt
1/2 cup Earth Balance butter substitute
1/2 cup canola oil
2 cups sugar
2 eggs
1 cup Tofutti soy sour cream substitute
1/2 teaspoon vanilla

Directions
Preheat oven to 350 degrees F. Grease a bundt pan with the Earth Balance.

Combine the walnuts, 1 Tablespoon sugar and cinnamon in a small bowl and set aside.

In a medium bowl, combine flour, baking powder and salt, blend well.

In the bowl of an electric mixer, combine Earth Balance, oil and 2 cups sugar and beat on high until light and fluffy. Beat in eggs, one at a time. Reduce speed to low and blend in sour cream substitute and vanilla. Add the flour mixture in 1/3 increments until all is incorporated. Pour 1/3 of batter into prepared pan then top with the walnut mixture. Cover with remaining batter. Bake for 1 hour. Let cool completely in pan on a wire rack. When cool, invert onto a serving plate.

Wednesday, December 8, 2010

GFCF Weekly Roundup: Creme Brulee

It's that time again - here are this week's favorite gluten-free, dairy-free/casein-free recipes! Especially with more holiday meals right around the corner, these treats are perfect for anyone at your holiday table!

GFCF Creme Brulee (pictured at right)
Ingredients
4 large egg yolks
1/2 cup plus 2 tablespoons granulated sugar
2 cups Silk soy milk creamer
1 vanilla bean, split lengthwise and scraped
1/4 cup air-dried light brown sugar (see Tips)

Directions
Preheat oven to 275º F.

In a medium bowl, whisk the egg yolks with half of the granulated sugar. In a small saucepan, warm the soymilk creamer with the vanilla-bean scrapings and the remaining granulated sugar until the soymilk creamer is steaming. Gradually whisk the hot soymilk creamer into the egg-yolk mixture until blended. Strain the custard and pour it into four 5-ounce ramekins or shallow gratin dishes.

Set the ramekins in a small baking dish and add enough hot tap water to the dish to reach halfway up the sides of the ramekins. Bake for about 1 hour and 15 minutes, or until the custards are just set. Let the custards cool in the water bath for 10 minutes, then remove from the baking dish and allow them to cool completely. Cover and refrigerate for at least 4 hours or overnight. The custards may crack a little on top, this will not affect the taste.

Preheat the broiler. Sift a thin even layer of the air-dried brown sugar over each of the custards. Broil one ramekin at a time as close as possible to the heat source until the brown sugar melts, forming a caramelized crust on top of the custard. Serve immediately.

Tips
Instead of cream, we used Silk soymilk creamer which produced a lovely creme brulee. Their web site is www.soymilk.com and it is distributed by White Wave, Inc. from Boulder, Colorado and available nationwide.

To air-dry brown sugar, sift it onto a plate and leave it out, uncovered, for 1 day. Alternatively, if the weather is humid, the sifted brown sugar can also be dried in the oven. Set the temperature at 250ºF and put the sugar in the oven for 20 minutes.

You might also like:
GFCF Cherry Coconut Scones, perfect for a holiday brunch!
GFCF Chestnut Torte, another holiday favorite featuring a seasonal treat!

Monday, December 6, 2010

Menu Monday: An Elegant Holiday Dinner

So as I wrote last Wednesday, I'm trying something different - more predictable - with my articles. On the first and third Mondays of the month, I will share one of our featured menus! This week, one of our favorite holiday menus for an elegant dinner.
This menu is elegant from start to finish. Start off the evening with light, but delicious Parmesan Crisps with Pecans & Basil – the perfect snack to keep your guests happy as they arrive. Follow up with a creamy and sinful Baked Swiss Chard. This dish may sound a little different but it happens to be one of our favorite starters. The Swiss chard is stuffed with cheese and then topped with cream and baked until bubbly and brown. This truly is a show-stopper. The salad is a beautiful combination of mixed greens, apples and pomegranate seeds lightly tossed with vinaigrette. The entrée will be one your guests will be talking about for months to come – Pepper Crusted Prime Rib with a Mushroom & Brandy Reduction sauce accompanied by Creamy Potato Gratin and roasted asparagus & leeks. And let’s not forget dessert! Finish the meal off with a delightful Pecan Pear Torte with Cream Cheese Frosting and if you really want to go that extra mile (and you happen to have an espresso machine), a cup of cappuccino!
-Chef Yvonne

On the Menu
Parmesan Crisps with Pecan & Basil
Baked Swiss Chard
Mixed Greens with Apples & Pomegranates
Pepper Crusted Prime Rib with Mushroom & Brandy Reduction
Creamy Potato Gratin
Asparagus & Leeks
Pecan Pear Torte with Cream Cheese Frosting (pictured at right)

Wednesday, December 1, 2010

GFCF Weekly Roundup - Holiday Desserts

Here at the Glutenfreeda Blog we're going to try something a little different - we're going to have established columns with new articles on a weekly and/or monthly basis. From gluten-free/casein-free recipes to product reviews, you'll soon be able to mark your life by our articles! =)

GFCF Chocolate Peppermint Squares
Makes 24 bars

Ingredients
1 ounce gluten free bittersweet chocolate, melted
1/4 cup Earthbalance butter substitute, softened
1/2 cup sugar
1 egg, lightly beaten
1/2 cup gluten free flour
1/4 cup walnuts, coarsely chopped
2 Tablespoons Earthbalance butter substitute, softened
1 cup powdered sugar
1 Tablespoon water
1/4 teaspoon peppermint extract
1 ounce gluten free bittersweet chocolate
1 Tablespoon unsalted butter

Directions
Preheat the oven to 350°F. Grease and lightly flour an 8x8 inch pan with gluten free flour. Cream Earthbalance, sugar and egg. Add 1 ounce of melted chocolate, 1/2 cup gluten free flour and nuts. Place mixture into prepared pan and bake for 20 minutes or until an inserted toothpick comes out clean. Remove from oven and allow to cool.

Meanwhile combine 2 Tablespoons Earthbalance, powdered sugar, water and peppermint extract. When cake layer is cool, spread Earthbalance mixture on top.

Melt remaining 1 ounce chocolate and 1 tablespoon Earthbalance; pour over filling. Chill in the refrigerator. Cut into 24 small bars.

GFCF Fresh Pear Crisp with Dried Cranberries
Ingredients
Topping

5 Tablespoons Earth Balance butter substitute, melted
1/2 cup gluten free flour
6 Tablespoons sugar
1 teaspoon baking powder
1/2 teaspoon cinnamon
1/4 teaspoon salt

Filling
3-1/4 pounds slightly underripe Anjou pears, peeled, halved, cored and cut into 1" pieces
3/4 cup dried cranberries
2 teaspoons fresh lemon juice
1/4 cup sugar
2 Tablespoons cornstarch
1/2 teaspoons cinnamon
1/4 teaspoon ground ginger
1 teaspoon orange zest

Directions
For the topping

Melt the "butter" in a small saucepan, remove from heat. Sift together flour, sugar, baking powder, cinnamon and salt. Add flour mixture to butter, tossing with a fork to form crumbs. Set aside.

For the filling
Preheat oven to 350 degrees F. Butter an 11"x7" baking dish. Add the pear pieces and the cranberries to the baking dish. Drizzle with lemon juice. In a small bowl, combine sugar, cornstarch, cinnamon, ginger and orange zest. Sprinkle the mixture over the fruit. Crumble the topping over the pears. Bake for 50 minutes. Serve warm (for the dairy indulgent, serve over gluten free vanilla ice cream).

Other GFCF favorites
GFCF Cranberry Apple Pie* (pictured at right)
GFCF Apple Cinnamon Cake
GFCF Pumpkin Apple Sauce Bread (substitute soy or almond milk)

*For this recipe, and all of our holiday pies, we recommend using Gluten Free Mama's Pie Crust Mix which can easily be dairy-free and egg-free!

Monday, November 29, 2010

Creative Crostini

Even though Thanksgiving has passed, Christmas is right around the corner and many of us are only beginning to entertain for the holidays. This week, we're featuring a lot of different options for one of our favorite appetizers: crostini. Crostini, Italian for "little toasts" are toasted slices white bread, topped with fruits, vegetables, cheeses and/or nuts to create a sweet & savory appetizer. Also known as bruschetta, crostini are traditionally prepared by first toasting the bread slices and then topping with fresh vegetables or fruits, etc. however, another great way to prepare these perfect hors d'oeuvres can also be topped and then baked or broiled for a warmer alternative.

Crostini or bruschetta has always been one of my favorite appetizers. And I’ve had success making gluten-free French bread to then make gluten-free crostini, however, the problem is it is time-intensive and requires a lot of prior planning. Often, when I’m entertaining, I’m focusing most of my attention on the main entrée and want just some yummy appetizers that can be easily and quickly thrown together. Prior to being gluten-free crostini was just that – quick and easy. Just buy a baguette, toast and top with a delicious topping. But as you probably know, there aren’t that many, if any, good gluten-free baguettes readily available at the grocery store. So what was once an easy appetizer then became kind of a more difficult challenge…until now.

This past month I had a dinner party and really wanted to make crostini and I had an idea that I thought might work to once again make crostini easy and delicious, gluten-free. I have had great success with Udi’s gluten-free bread for sandwiches and toast, but since it’s sold as sandwich bread that is really as far as I had taken it. Then I thought, why wouldn’t it work to use it as crostini? So I cut off outer crust of each slice and cut each piece on the diagonal to give me cute little bread triangles. I then lightly coated each slice with oil (in this case I used walnut oil) with a pastry brush and toasted them in the oven. Then I topped them with my topping and voila – what resulted was perfect, delicious crostini appetizers that were beautiful in presentation!

Not only was the crostini great but the topping I used was spectacular as well. This is a great recipe for the holidays and now only takes just a few minutes to pull together
-Chef Yvonne

Here are some of our favorite crostini & bruschetta recipes from over the years. Although most recipes officially call for gluten-free french bread or a baguette, we have had such great luck using Udi's that we recommend you give it a try!

Don't forget - crostini and bruschetta can easily be gluten-free/dairy-free - just omit the cheese! The most basic and traditional Italian recipe calls for lightly toasted bread slices topped with freshly diced tomatoes, minced basil, a little bit of minced garlic or onion, and a sprinkle of olive oil.

Bruschetta with Tomato, Smoked Salmon & Herbs
Kalamata Olive Pate with Roasted Garlic & Basil Crostini
Lemon Basil Crostini
Warm Goat Cheese Crostini with Honey, Rosemary & Walnuts
Bruschetta with Gorgonzola & Apples
Bruschetta with Honeyed Tomatoes & Mascarpone
Goat Cheese & Sun Dried Tomato Bruschetta (seen above)
Roasted Pepper Bruschetta

Monday, November 22, 2010

Thanksgiving Leftovers

After the tryptophan-induced food-coma has worn off and you have exhausted your quota for turkey sandwiches, what do you do with all of those delicious leftovers? While Turkey Tetrazzini is a traditional standby, why not mix things up this year with some creative leftover solutions?

After the big feast of Thanksgiving is over, often you are left with extra turkey. Perhaps in the days before you were diagnosed with gluten intolerance, you would use the leftovers for turkey sandwiches (or perhaps you still do with gluten-free bread), but there is so much more that can be done with the delicious already wonderfully roasted turkey meat. Over the years we have amassed a large selection of amazing recipes utilizing already cooked turkey meat. Below you will find a large selection of recipes categorized by lunch, dinner or soup/chili -- which can be enjoyed as a lunch or main course dinner!


LunchChilis/SoupsDinner**Turkey Photograph copyright National Wild Turkey Federation // Joe Blake**

Wednesday, November 17, 2010

Showstopping Stuffings


I don't know about you, but Thanksgiving dinner without stuffing just isn't Thanksgiving. Whether you prefer wild rice, cornbread or a traditional stuffing, we have a whole recipe box dedicated to sensational ideas for your turkey's favorite sidedish sidekick!

Recreating traditional stuffing, gluten free, can be a challenge. Over the years, we have tried using everything from store-bought gluten-free breads to baking mixes to baking from scratch - with some really great results. But given that Thanksgiving dinner is already an all-day (or two day) event, trying to add bread-baking to the process is not always the easiest (or least-stressful!) idea. Instead, we have had unbelievable results with both Van's Gluten Free Waffles and Udi's Gluten Free Bread. For both, simply defrost, cube and you're ready to go!

Whether you prefer to ‘stuff’ your turkey or bake the stuffing separately, the following recipes will steal the show at your holiday table. Each of the following recipes have received a five star rating from our readers and we agree, stuffing never tasted so good!
-Chef Yvonne

Herbed Bread Stuffing

Ingredients
2 boxes (12 waffles) Van’s gluten-free/wheat-free frozen waffles, toasted and cut into 1/2" cubes
3 medium onions, chopped
3 celery ribs, thinly sliced crosswise
1-1/2 teaspoons herbs de provence
1/2 teaspoon dried sage
1/2 cup unsalted butter (1 stick)
1-1/2 cups gluten free chicken stock
Kosher salt and fresh ground pepper

Directions
Preheat oven to 350 degrees F.

Toast the frozen waffles 1-1/2 times, until crispy but not burned. Let cool, then cut into 1/2" cubes. Set aside. (Alternately, defrost, cube and toast in the over on a baking sheet until golden brown.)

Cook onions, celery and herbs in butter in a large heavy skillet over medium-low heat, stirring occasionally, until vegetables are softened, about 10 minutes. In a large bowl, toss together bread cubes, vegetables and stock. Season to taste with salt and pepper. Transfer the stuffing to a large baking dish. Bake, uncovered for 20 minutes or until heated through.

Cornbread, Bacon, Spinach & Cashew Stuffing

Ingredients

For the cornbread (see Notes, below)

1 cup gluten free flour
1 cup corn meal
2/3 cup sugar
1-1/2 Tablespoons baking powder
1/2 teaspoon salt
1-1/4 cups whole milk
3 large eggs, lightly beaten
1/2 cup canola oil

For the stuffing
2 onions, chopped
1 lb. sliced bacon, cut crosswise into 1-inch wide pieces
3 celery ribs, chopped
1 red bell pepper, chopped
3 garlic cloves, minced
9 oz. baby spinach, trimmed and coarsely chopped
2 cups cashews, coarsely chopped
1/2 cup (1 stick) unsalted butter, melted
1 cup gf Chicken stock
Salt and freshly ground black pepper

Directions

Make the cornbread
(Cornbread can be made a day ahead of time.)
Preheat oven to 350°F.

In a large bowl, combine gf flour, corn meal, sugar, baking powder and salt. In a separate bowl, combine milk, eggs and canola oil. Pour liquid ingredients into dry and mix until just combined.

Pour the batter into an 13x9-inch greased baking dish. Bake for 18-20 minutes or until a toothpick inserted in center comes out clean. Let cool completely on a rack. Cut the cornbread into 1-1/2 inch cubes. Lay out on a baking sheet. Preheat the broiler. Broil cornbread cubes, turning halfway through, for 3-4 minutes or until lightly browned.

Cook the bacon in 2 batches in a large heavy skillet over medium heat, stirring until crisp, about 10 minutes. Transfer the bacon with a slotted spoon to paper towels to drain. Reserve about 3 tablespoons of the bacon fat.

Add the chopped onion and celery to the skillet; sauté until crisp tender, about 3 minutes. Add the bell peppers; sauté for 4-5 minutes. Add the garlic; sauté for about 1 minute. Transfer the vegetables to a large bowl and stir in the spinach, cashews and cornbread cubes. Add the butter, stock and bacon. Stir to combine. Adjust seasonings to taste with salt and freshly ground black pepper.

Preheat the oven to 350°F. Transfer the stuffing to a large baking dish. Bake, uncovered for 20 minutes or until heated through.

Notes: In the past, we have also used Pamela's Cornbread Mix which is super quick and easy, available in most grocery stores.

Apricot Wild Rice Stuffing

Ingredients

3/4 cups wild rice
1/2 cup chopped dried apricots
1/4 cup dry white wine
1/4 cup water
1/4 cup dried cherries
1/4 cup toasted pine nuts
2 Tablespoons chopped fresh parsley
1/8 teaspoon freshly grated nutmeg
1/8 teaspoon ground cloves
1/4 teaspoon salt
1/8 teaspoon freshly ground black pepper
2 Tablespoons unsalted butter
1/2 cup finely chopped celery
1/4 cup chopped scallions

Directions
Cook the wild rice according to package instructions.

Meanwhile, in a medium bowl, combine apricots, white wine and water. Heat in the microwave on high 1 to 2 minuts or until hot. Let stand 10 minutes; drain.

Heat the oven to 350 degrees. Grease a 2-quart casserole. Drain apricots and discard the soaking liquid; place apricots in a large bowl. Add cooked wild rice, cherries, pine nuts, parsley, nutmeg, cloves, salt and pepper.

Melt butter in a large skillet. Add celery; cook 6 to 8 minutes or until tender. Add scallions, cook another 30 seconds. Add to wild rice mixture; mix well. Season to taste with salt and freshly ground pepper. Spoon into casserole.

Bake 30 to 40 minutes or until hot.

Pear & Pine Nut Stuffing

Ingredients
1 Tablespoon unsalted butter
1/2 cup chopped onion
1 pear, peeled, cored and chopped
1/3 cup gf cornbread
1/4 cup toasted pine nuts
3/4 cup chopped parsley
1/2 teaspoon salt
1/8 teaspoon fresh ground pepper
3 Tablespoons melted butter
1/2 cup gluten-free Chicken Stock

Directions
Preheat oven to 350 degrees F.

Melt butter in medium skillet over medium-high heat. Add onion and cook until translucent. Add remaining ingredients and cook until heated through. Add melted butter and stock and toss to blend.

Transfer to baking dish and bake for 20-30 minutes. Serve.

For more recipe ideas, visit Glutenfreeda.com!

Monday, November 15, 2010

Tradition? Tradition!

While we love coming up with new and innovative gluten free recipes and menus for Thanksgiving (and the rest of the year!), sometimes you just want traditional comfort food! So here it is, our most traditional gluten-free Thanksgiving menu - featuring old favorites, new flavors and our best recipes yet!

Our Traditional (Gluten-Free) Thanksgiving Menu
While you won't find any candied yams or cream of (vegetable) soup anywhere in this menu, this collection of recipes features our favorite, most well-cherished memories. Maybe one day these recipes will become some of your favorites, too.

StartersMain Course Dessert

Wednesday, November 10, 2010

Our Gluten-Free Thanksgiving Game Plan

This month, in addition to featuring a gluten-free Thanksgiving menu which serves 10-12 guests, we also have an amazing menu on a smaller scale -- serving 4-6 people. Although the recipes from our first menu are initially scaled to serve 4-6, the number of dishes in this menu -- and the different blend of flavors! -- are better suited to a more intimate dinner party.

A holiday message from our chef and founder:
Although the “day of” preparations may seem exhausting, keep in mind that since you have already done a lot of the prep work in the days before, the actual “to-do” items on Thanksgiving day are not at all hard, but actually rather easy, because you are just assembling or re-warming, for the most part. One final suggestion is to make time in the middle of Thanksgiving day to relax and enjoy the day. This is time for you to take a shower, put your feet up and enjoy the wonderful aroma’s floating through your home.

We hope you have a wonderful Thanksgiving.
-Chef Jessica

Appetizer
Main Course Dessert Game Plan & Timeline 1 week before Thanksgiving
  • Read through all recipes in menu
  • Make grocery list
  • Go shopping
3 Days before Thanksgiving
  • Thaw the turkey breast in the refrigerator
  • Make cranberry sauce
2 Days before Thanksgiving
  • Toast bread for stuffing and cube
1 Day before Thanksgiving
  • Make the stuffing
  • Butterfly turkey breast
  • Make candied walnuts for the salad
  • Caramelize the onions for the mashed potatoes
  • Make Pumpkin Brulee
  • Make gluten-free baguette
Day of Thanksgiving (assume dinner is served at 3pm)
  • 9am Wash greens for salad; chill. Make dressing for salad
  • 9:45am Remove the cranberry sauce from the refrigerator
  • 10am Stuff the turkey breast and roll into roulade; cover and set aside
  • 10:30am-12:30pm RELAX
  • 12:30pm Toast baguette slices for appetizer
  • 12:45pm Make Honeyed Tomatoes
  • 1pm Start roasting turkey roulade
  • 2pm Make mashed potatoes, re-warm the caramelized onions
  • 2:30 Serve Bruschetta
  • 2:45 Remove the turkey from the oven and let rest; while resting make gravy
  • 3pm Serve Main Course
  • 5-6pm Serve Pumpkin Brulee

Monday, November 8, 2010

Holiday Pies

With the holidays fast approaching, gluten free chefs everywhere are already beginning to plan and test their dessert menu. From pie crusts to cake batter, cheesecakes and tarts, creating elegant and delicious gluten free confections is a challenge to be faced and overcome each holiday season. With all of the amazing recipes available at Glutenfreeda.com, we wanted to highlight a few of our favorite recipes and techniques.

While this recipe calls for creating pie crust from scratch, we have recently discovered (and fallen in love with!)Gluten Free Mama's Pie Crust Mix, making this recipe Gluten-free/Dairy-free (or GF/CF) is, well, easy as pie! Even easier, her pie crust can also be egg-free by substituting honey for an equally delicious option. Using this pie crust, not only can you make a delicious, easy and impressive gluten free dessert, but it can just as easily be
dairy free/casein free and egg free as well. (For more information, check out our product review of Mama's Pie Crust!)

A message from our head chef:
This holiday season, if you’d like to enjoy your favorite fruit pies without all the construction work, we have a beautiful and delicious option; free form pies. A free form pie is simply a pie without the pie dish. The steps are easy and the result is a gorgeous dessert that we think is much more beautiful than a traditional pie.

Free form pies are best suited to fruit pies, such as apple, peach or cherry; fillings made of mostly fruit because they do not have the pie dish to hold in a great deal of liquid.

The chilled dough is rolled out the same as a traditional pie and cut into the largest even circle you can make. Transfer the dough disk to a parchment lined baking sheet and fill the center with sugared fruit. Gently fold an edge of the dough about 3” over the filling then lift another section of the edge and fold it up over the filling, laying it on top of the last fold. This process is continued around the pie until all edges are folded over. The end result will leave the center of the ‘pie’ uncovered with the fruit exposed.

This is a beautiful dessert that is simple to make and eliminates any of the typical difficulties associated with making gluten-free crust. Try this recipe and you may never need a pie dish again!
-Chef Yvonne

Apple & Cranberry Free Form Pie
Be sure to thoroughly chill the dough and this recipe will be as easy as pie!

Makes 2 pies/Serves 10

Ingredients
2-1/2 cups gluten free flour mix
1/2 cup sugar (extra for sprinkling)
1/2 teaspoon salt
1-1/2 sticks unsalted butter, cut into 1/2” pieces and chilled
1/2-3/4 cup ice water
1 teaspoon lemon zest
1/2 teaspoon fresh lemon juice
4 Granny Smith apples, peeled, cored and thinly sliced
1/2 cup fresh cranberries
1 egg white, beaten

Directions
Add gluten free flour, 1 teaspoon sugar and 1/2 teaspoon salt to the bowl of a electric stand mixer. Add chilled butter and mix with a paddle at low speed until the mixture resembles the size of small peas. With the machine running gradually add the ice water, about 1 Tablespoon at a time, until the dough is evenly moistened and looks like it will hold together when kneaded into a ball. (We used about ¾ cup water to get to this stage) Turn the dough onto a floured work surface and form into two balls. Form each ball into disks, wrap with plastic wrap and refrigerate for at least an hour.

Preheat oven to 400 degrees F. Line two baking sheets with parchment paper.

On a lightly (gluten free) floured surface, roll out a disk into a large round, dough should be about 1/8” thick. Loosen the dough from the surface with a spatula and carefully transfer it to the baking sheet. Repeat with other disk.

In a large bowl, add 1/2 cup sugar, lemon zest and a pinch of salt. Add apples, cranberries and lemon juice and toss well. Arrange apple mixture in the center of each dough round, leaving a 3” border all around. You can decoratively arrange the apples so they make a design when baked. Brush the overlapped top of the crust with egg white and sprinkle with sugar. Place pie in oven and bake for 55 minutes. Let cool, then transfer to a plate and cut into wedges to serve.

Monday, November 1, 2010

Thanksgiving is fast approaching!

Well, with Halloween officially behind us, Thanksgiving is just around the corner and now is the perfect time to start planning your feast! The biggest meal of the year for most, Thanksgiving dinner is often a time for reviving old favorites - but it can also be the ideal venue for experimenting with new recipes. So this year, in addition to offering dozens of tried-and-true Thanksgiving recipes and menu ideas, we also have a menu plan for a Mexican-themed Thanksgiving feast. This year, be adventurous and try out these new recipes from your favorite gluten free recipe source!

In addition to offering traditional favorites - and traditions reinterpreted - our Thanksgiving Dinner menus offer a complete timeline from grocery shopping to carving the turkey! Everything you need to execute an elegant, effortless Thanksgiving feast is available at your fingertips through Glutenfreeda.com Stay tuned throughout the month for menu plans and some of our favorite recipes.

For a preview of our Mexican-inspired Thanksgiving Feast, check out our featured article in this month's magazine.

-Glutenfreeda