Showing posts with label breakfast/brunch. Show all posts

Wednesday, April 13, 2011

GFCF Weekly Roundup: Orange Almond Cake


Also our GFCF feature for the month, this recipe is perfect for spring when most citrus fruits are just past their peak and are no longer quite at their peak. The almond meal is super healthy, low glycemic and low carb, and the only fat is from the delicious and heart-healthy olive oil - yum!

The olive oil keeps the cake moist (perfect for leftovers) and is sweet enough for dessert, but not so unhealthy you couldn't enjoy some for breakfast or brunch. By grinding your own almonds into a meal, you can control both the texture and certify that the product is 100% gluten free.

Serving Suggestions

Ganache or chocolate glaze, Sabra glaze (orange-chocolate liqueur), confectioner’s sugar. Honestly, our house isn’t huge on super-sweet desserts and we love it plain. Next time, I’ll probably press sliced almonds into the top of the cake half-way through baking for a more elegant appearance.

For storage, keep at room temperature and cover tightly with plastic wrap to maintain moisture. This cake improves with age and is best on its second or third day.

Orange Almond Cake
Serves 4-6

1 small/medium orange*
1 lemon*
6 ounces whole almonds**
1 cup gluten free flour (like Jules Gluten Free Blend)
1 Tbsp baking powder
4 large eggs (or 5 medium), at room temperature
1/2 tsp salt
1 1/2 cups sugar
2/3 cup olive oil (the higher quality the oil, the better)
Confectioner’s sugar, for serving (optional)

First things first, get started on preparing the citrus. Put the orange and lemon in a saucepan and fill with enough water to cover. They’re going to float, don’t worry about it. Bring to boil over medium-high heat, then reduce heat and simmer for 30 minutes. Drain and set aside to cool.

In the mean time, preheat the over to 325F (one rack in the center) to toast the almonds. Distribute the almonds on an ungreased sheet pan and bake for 10-15 minutes until they look golden and smell all roasty and delicious. Err on the side of over-toasted, just make sure they don’t burn! Let them cool completely, (I dumped mine out onto a tea towel to expedite the process) then toss ‘em in the food processor until finely ground, like corn meal. Set aside and don’t worry about cleaning out the food processor.

Bump the oven temperature up to 350F and grease a 9 or 10-inch springform pan. The baking time will differ depending on which size you choose/have on hand.

When the fruit has cooled, cut the lemon in half and scoop out the pulp and seeds; discard. Cut the orange in half also and remove the seeds, leaving pulp in tact. Put the lemon rinds and orange halves in the food processor and chop until they form a really coarse paste.

Meanwhile, combine flour and baking powder in a small bowl.

In a mixing bowl or the base of a stand mixer, combine eggs and salt, then beat until foamy. Gradually beat in sugar. If using a stand mixer, switch to the blade attachment, stir in the flour/baking powder mixture. Beat in (on low speed) the fruit, almonds and olive oil, until just incorporated, but be careful not to over mix! Pour batter into springform pan and bake until toothpick comes out clean: 45-60 minutes for a 9-inch pan, 30-40 for a 10-inch pan.

Remove from oven and cool in the springform pan on a wire rack (I used the stovetop of my gas range– you just need circulation to facilitate quicker cooling). Remove the sides of the pan (by far, my favorite aspect of using the darn things) and serve.

Notes

* Because you are eating the whole fruit, rind and all, if possible, use organic fruit.

** You can substitute pre-roasted almonds but it turns out so much better with freshly toasted almonds.

Wednesday, March 23, 2011

GFCF Weekly Roundup: Lemon Polenta Cake


In honor of Oranges and Lemons Day next week (March 30th), I thought this would be the perfect recipe to feature! The whole thing comes together really quickly and the bake-time rivals a pan of brownies. Polenta, reconfigured as grits in the South, comes in both an instant and original varieties.

GFCF Lemon Polenta Cake
Ingredients
2 cups gluten free flour
1/4 cup polenta (coarse ground cornmeal)
1 teaspoon baking soda
1/2 teaspoon baking powder
1/2 teaspoon salt
1/2 cup vegetable oil
2 Tablespoons fresh lemon juice
1 Tablespoon vanilla extract
2 large eggs
1 cup sugar
1 Tablespoon lime zest
Powdered sugar

Directions
Preheat oven to 325°F. Butter a 9" springform pan on the bottom and sides.

In a medium bowl, combine gluten free flour, polenta, baking soda, baking powder and salt. In a small, separate bowl, combine oil, lemon juice and vanilla extract. In a large bowl, beat eggs with sugar on medium speed until thick, about 3-4 minutes. Gradually beat in oil mixture and lime zest. Gently fold in dry ingredients until just blended.

Scrape batter into prepared springform pan. Bake for about 50 minutes or until center springs back when lightly pressed. Let cake cool on a wire rack for 5 minutes. Release cake from spring form pan and let cool completely. Cut into wedges and dust with powdered sugar.

Photo by avlyxyz on Flickr.

Wednesday, March 16, 2011

GFCF Weekly Roundup: WAFFLES

That's right, WAFFLES - in all caps. I love waffles; I miss waffles; and with this allergy friendly recipe, now they can be enjoyed by everyone around.
Perfect for breakfast in bed or a weekend brunch, these gluten-free and dairy-free waffles are a crowd pleaser. Even though berry season is still a few months away, the beauty of this recipe is that it works best with frozen fruit! While dairy free pancake and waffle recipes are easier and easier to come by, they don't always make for the most traditional-style breakfast - but not these! While they are deliciously GFCF, these waffles will bring back memories of your favorite weekend brunches. No matter what time of year, these waffles will make you feel like spring is right around the corner!

Gluten free, Dairy/Casein free Waffles with Berry Syrup

Ingredients
For the waffles

1-3/4 cups gluten free flour (like Jules All-Purpose)
1 Tablespoon baking powder
1/4 teaspoon baking soda
1 Tablespoon sugar
1/2 teaspoon salt
3 large eggs, lightly beaten
6 Tablespoons Earth Balance butter, melted
2 Tablespoons canola oil
1-1/2 cups soymilk up to 1/2 cup water (to thin batter, if needed)

For the syrup
1-1/2 cups frozen blueberries
1-1/2 cups frozen unsweetened raspberries
1/2 cup pure maple syrup
1/4 teaspoon ground cinnamon

Directions
For the Waffles


Preheat a waffle iron.

In a large bowl, combine the gluten free flour, baking powder, baking soda, sugar, and salt. In a separate bowl, combine the eggs, melted Earth Balance butter, canola oil and soy milk. Make a well in the center of the dry ingredients and pour in the wet ingredients. Mix until the mixture is just combined. (If the batter is too thick, thin with a little water. You may need to thin the batter between waffles - it tends to thicken as it sits.)

Spoon 1/2 cup of the batter onto the hot waffle iron. Close the lid and bake until the waffle is golden or the waffle iron indicates it is ready. Repeat process with remaining batter.

For the Syrup

While waffles are cooking, combine the berries, maple syrup and cinnamon in a saucepan. Cook over medium heat until thoroughly heated and some of the berries have broken down. Serve syrup over waffles.

Friday, February 18, 2011

Product Review: Sof'ella All-Purpose Baking Mix

Sof'ella Sour Cream Coffee Cake
The Review

Ingredients
White Rice Flour, Navy Bean Flour, Cornstarch, Tapioca Starch, Vanilla Powder (Dextrose, Vanilla Bean Extractives), Baking Powder, Sea Salt, Baking Soda, Xanthan Gum.

Overall Rating - 4 out of 5 stars

Taste
I made pancakes, a much anticipated treat, and the first I'd tasted since going gluten free. Plain with no "trimmings" the pancakes had a definite aftertaste which I believe can be accounted for by the inclusion of navy bean flour. The vanilla powder flavoring counteracted the aftertaste a bit, but not enough to completely mask it. A pat of butter and some maple syrup helped the palatability, but the after-taste was still present, no matter what I tried (and I tried three different flavors of jam after the syrup). I'm not sure this would be my first choice of mix when making pancakes or waffles, but it's an alternative when something else isn't handy. Of course the navy bean flour contains terrific nutritional value, so each cook will need to decide what's most important. BC

For this review, I prepared both pancakes and a Sour Cream Coffee Cake recipe included with the mix. For the pancakes, I did notice a distinct aftertaste- but promptly did away with it by including (a lot of) chocolate chips. Whoops. The taste is not overpowering and for me, it wasn't even that distracting (so maybe my chocolate chip to pancake ratio was a little high) but still... they were pretty good! And, as Becky reminds us, Navy Bean flour is a really healthy ingredient and, much like flax, I can handle a little healthy getting in the way of my pancake inhaling erm, eating...

As for the coffee cake, the taste was hardly noticeable! There was a bit of a taste, but I'm 99% sure it was from my nutmeg and not the mix -- similar incident a few recipes ago. Either way, the coffee cake had no such aftertaste but could use a little bit more brown sugar in the crumb topping. Maybe not the best coffee cake I've ever tasted EVER, but perfect for a short-notice breakfast or brunch! KG


Texture
WOW - the pancakes I made cooked up exactly like those made with wheat flour! They were moist, light but dense (who knew that was possible?) and cooked like a dream. As they were cooking, the pancakes even filled with little bubbles that popped as they were cooking, just like the pancakes from my old-style cooking days. My mother's rule of thumb was always five bubbles popped and they were ready to turn, and I'll be darned if that wasn't the case here as well! Lightly browned, moist and tender - a great texture overall! BC

Pancakes - epic! Fluffy and light and bubbly and deep enough to wrap my chocolate chips in a nice big hug - I would call this a win. The coffee cake was unbelievably moist without being dense (see photo above) - with air pockets and crumbs and awesome baked in a cake pan. KG

Storage
Inside the box is an inner paper bag to preserve freshness, and this is handy for easy re-sealing. The box holds 1 lb., or approximately 3 1/3 cups of mix, so there's enough for several weekends' worth of pancakes or waffles. BC

Amen! But the package is kind of disappointingly small... with only 3 1/3 cups in the whole box, you can only really make one recipe + pancakes/waffles with a single box...KG

Availability
Available through the Sof'ella website for both commercial and wholesale orders. Also available in some specialty food markets nationwide with a growing distribution weekly!

Tuesday, February 15, 2011

Recipe of the Week: Eggs Benedict

This week's featured recipe is Eggs Benedict, the foundation for the perfect brunch for two -- or ten!

Eggs Benedict
Serves 4
Ingredients
8 slices of gluten free french bread, toasted**
8 thick slices of gluten free ham, precooked and warmed
8 poached eggs
Hollandaise sauce

Directions
Prepare gluten free hollandaise. Place 2 pieces of toast on each plate. Lay one piece of warm ham and 1 poached egg on each piece of toast. Spoon hollandaise sauce equally over each portion. Serve immediately.

Hollandaise Sauce
Ingredients
4 egg yolks
1/2 cup butter, room temperature
2-3 Tbsp lemon juice
Salt
White pepper

Directions
Cook egg yolks and 1/3 of the butter in the top of a double boiler, stirring rapidly over boiling water until butter melts. Add 1/3 more of the butter, stirring rapidly. Continue process until all of the butter is melted; the mixture will thicken. Stir constantly.

Remove pan from water, stir in lemon juice, 1 tsp at a time. Stir in a dash of salt and pepper. Heat again over boiling water, stirring constantly until thickened. Remove from heat. If sauce curdles, beat in 1-2 Tbsp boiling water.

Tips

**Have some gluten free french bread prepared. Cut diagonal slices and toast. OR use slices of Udi's Gluten Free Bread OR Kinnickinick English Muffins - yum!

Tuesday, February 1, 2011

Recipe of the Week: Asparagus Wrapped in Prosciutto

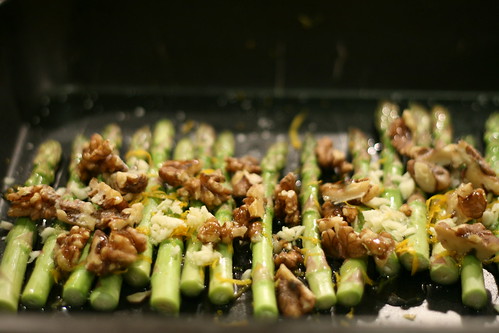
With spring right around the corner, fresh asparagus is cropping up in grocery stores across the country! With the subtle sweetness of the cream cheese and the saltiness of the prosciutto, every part of this recipe accentuates the bright flavor and crisp texture of fresh asparagus.

Asparagus Wrapped in Prosciutto

Ingredients
4 ounces whipped gf cream cheese
24 asparagus spears, cut to 3" from tip of spear and blanched
1 clove of roasted garlic
Pinch of fresh ground pepper
12 slices of proscuitto, cut in half crosswise

Directions
In a small bowl, combine cream cheese, garlic and pepper. Mix well.
Heat oven to 350 degrees F.
Spread cream cheese mixture on each slice of proscuitto. Wrap a proscuitto slice around the center of two asparagus spears. The cream cheese mixture will allow the proscuitto to stick to itself nicely. Place each bundle on a baking sheet and bake for 4 minutes or until heated through. Serve immediately.

Roasting Garlic: Cut about 1/4" off the top of a head of garlic to expose the cloves. Rub head all over with olive oil and wrap in foil. Bake for 45 minutes at 350 degrees F.

Tips
For the best presentation, select small to medium spears.

Wednesday, January 12, 2011

GFCF Weekly Roundup: Raisin Bread

Because sometimes all you want in the morning is a slice of moist and delicious cinnamon raisin bread, this recipe is an allergy friendly crowd pleaser!

GFCF Raisin Bread
Ingredients
2 large eggs
1 large egg white
2 Tablespoons water
2/3 cup sugar
1/4 cup canola oil
1 Tablespoon orange zest
1 cup Tofutti sour cream substitute
2 cups gluten free flour (like Jules)
2 teaspoons baking powder
1/2 teaspoon baking soda
1-1/4 cups raisins

Directions
Preheat oven to 325 degrees F and grease a loaf pan.

In a large bowl, beat eggs, egg whites, water, sugar, oil and orange zest until blended. Stir in sour cream. In a separate bowl, mix together flour, baking powder and baking soda. Add egg mixture to dry ingredients and beat until blended. Stir in raisins. Spread batter into loaf pan and bake for 1-1/4 hours or until the sides come away from the pan and an inserted toothpick comes out clean. Let cool in pan on a rack for 15 minutes.

Tuesday, December 7, 2010

Weekly Recipe: Cauliflower and Thyme Frittata

Each week we feature one of our favorite recipes and I want to do more to share these recipes with you! This week, we are featuring a fantastic new spin on an old-time favorite: the frittata. Infused with cauliflower, baby broccoli and thyme, this favorite brunch feature is chock full of vegetables and can be enjoyed hot, cold or at room temperature.

Cauliflower Frittata with Thyme
Ingredients

2-1/2 Tablespoons unsalted butter
1 Tablespoon olive oil
1/4 medium cauliflower, cut into 1-inch florets
1 cup of baby broccoli, cut into 1-inch pieces
1 medium onion, halved and thinly sliced
3 small garlic cloves, thinly sliced
1 teaspoon fresh chives, minced
1 teaspoon fresh thyme, chopped
10 large eggs, at room temperature, lightly beaten
Salt and freshly ground black pepper
1/4 cup Parmigiano Reggiano cheese, grated

Directions
Preheat the broiler. In a 10-inch non-stick, oven-proof skillet, melt 1/2 tablespoon butter in the olive oil. Add the cauliflower, season with salt and cook over high heat, without stirring, until golden brown on the bottom, about 2 minutes. Toss the cauliflower florets in the pan. Add the broccoli and cook until the cauliflower is golden all over and both the cauliflower and baby broccoli are just tender, about 3-4 minutes longer. Add the sliced onion and 1 tablespoon of the butter and cook, stirring occasionally, until the onion is softened, about 3 minutes. Reduce the heat to medium, add the garlic and cook for 1 minute. Add the remaining tablespoon of butter and swirl the pan to melt it.

Meanwhile, in a large bowl, whisk the eggs with 3/4 teaspoon of salt and a few grates of freshly ground black pepper. Whisk in the herbs. Pour the eggs over the vegetables and cook, without stirring, until the bottom of the frittata is just set, about 2 minutes. Lift the edges of the frittata and tilt the pan to allow the uncooked egg mixture to seep underneath. Continue to cook the frittata until the bottom is golden and the top is just slightly runny, about 3-4 minutes.

Sprinkle the top of the frittata with Parmigiano Reggiano cheese and place under the broiler for 1-2 minutes or until the top is just set. Slide the frittata onto a work surface or platter and cut into wedges and serve warm or at room temperature.